

Indulge in the ultimate guilt-free pleasure with this mouthwatering gluten free brownie recipe! Made with a surprising and wholesome twist, these chickpea brownies are the ultimate game-changer in the world of desserts. With a fudgy texture, rich cocoa flavor, and a hint of nuttiness, they are guaranteed to satisfy even the most discerning sweet tooth.
If you love making healthy gluten free brownies, then why not check out my flourless protein brownies recipe or this vegan banana bread recipe that can easily made gluten free? Or if its chocolate recipes you love then make sure to try my chocolate peanut butter smoothie!
Ingredients needed for the best gluten-free chickpea brownies
Making these brownies is simple. All you need is the following ingredients:
- 1½ cup canned chickpeas (1 can) (you can also use borlotti beans or black beans)
- ½ cup peanut butter
- ½ cup dark chocolate chips (vegan)
- ⅓ cup maple syrup or agave syrup
- ⅓ cup almond milk or any milk of choice
- ¼ cup cacao powder
- 2 teaspoons vanilla extract
- 1 teaspoon baking powder
- ½ teaspoon salt
I like to use pink Himalayan salt for its subtle flavor, but any type of salt will work. With these simple ingredients, you'll be on your way to creating the best gluten-free chickpea brownies you've ever tasted!


Step-by-step instructions for making gluten-free chickpea brownies
Now that you have all the ingredients ready, let's dive into the step-by-step process of making these delicious gluten-free chickpea brownies:
- Preheat the oven to 350°F (180°C).
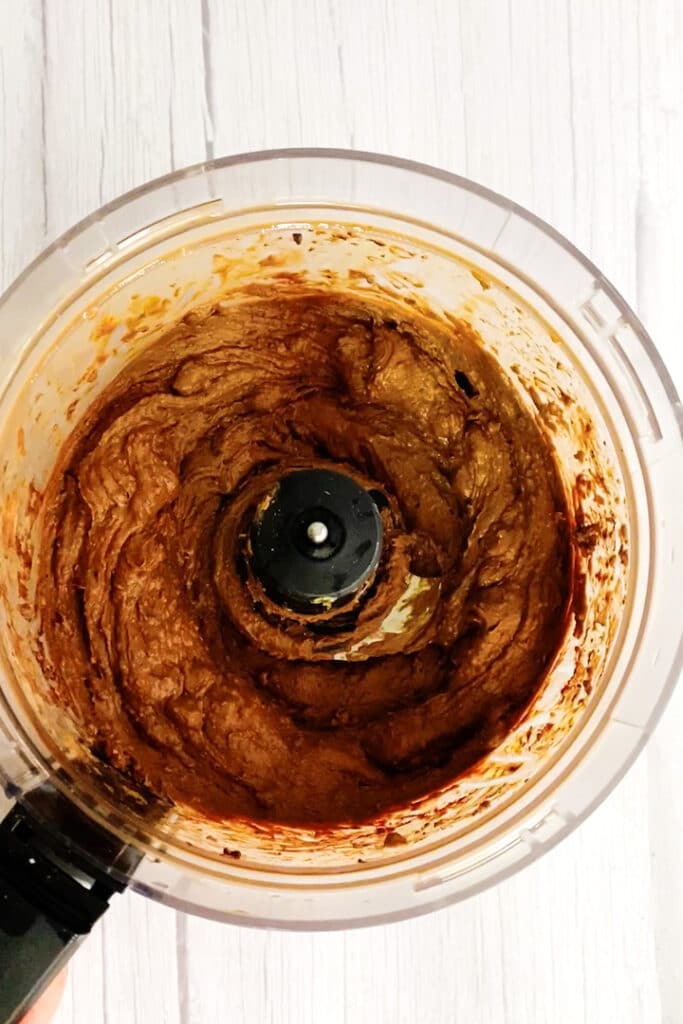
- Combine the ingredients in a food processor. Process until the mixture is smooth and well combined. Make sure to scrape down the sides of the food processor to ensure all the ingredients are incorporated.
- Transfer the batter: Transfer the batter into a greased or lined baking pan. Spread it evenly using a spatula or the back of a spoon.
- Bake the brownies: Place the baking pan in the preheated oven and bake for approximately 25-30 minutes, or until a toothpick inserted in the center comes out with a few moist crumbs. Be careful not to overbake, as this can result in dry brownies.
- Cool and slice: Once baked, remove the brownies from the oven and let them cool completely in the baking pan. This allows them to set and develop their fudgy texture. Once cooled, slice into squares or desired shapes.
- Enjoy: The brownies can be served immediately or chill in the fridger first. I much prefer the latter! The refrigerated brownies are denser and more fudgy, which I prefer.
Expert Tips For This Gluten Free Brownies Recipe
To ensure your gluten-free chickpea brownies turn out perfect every time, here are some tips to keep in mind:
- Use a high-quality creamy peanut butter. This will ensure that the brownies are fudgy but it also is what binds the brownies together. A low quality, crumbly peanut butter will result in a dry crumbly brownie.
- Choose high quality dark chocolate chips. Dark chocolate with a cocoa content of 70% or higher will provide a rich and intense chocolate flavor. The dark chocolate chips that I like to use I also enjoy eating on their own. Cheap chocolate will not be great in this recipe.
- If you prefer a sweeter brownie, you can increase the amount of maple syrup or agave syrup to suit your taste.
- Feel free to experiment with different add-ins, such as chopped nuts, dried fruits, or even a swirl of peanut butter on top of the batter. Get creative and customize your brownies to your liking!
- When baking the brownies, keep a close eye on them to avoid overbaking. The toothpick test is a reliable indicator of doneness – a few moist crumbs clinging to the toothpick indicate that the brownies are perfectly fudgy.
Variations and additions to customize your chickpea brownies
While the base recipe for gluten-free chickpea brownies is already delicious on its own, there are numerous variations and additions you can try to customize your brownies:
- Nutty delight: Stir in a handful of chopped nuts, such as walnuts, pecans, or almonds, for an added crunch and nutty flavor.
- Fruity surprise: Fold in dried fruits like cranberries, cherries, or raisins to add a burst of sweetness and texture to your brownies.
- Spice it up: Add a teaspoon of ground cinnamon to the batter for a hint of warmth and spice.
- Use a different bean: This recipe specifically calls for chickpeas. However, you can actually use 1.5 cups of any type of bean. I have successfully used borlotti beans before. I have shared this recipe with borlotti beans on both my Pinterest and Instagram pages. Another great bean to use would be black beans.
Alternatively, you could also try the recipe with kidneys beans, or black beans. Popular blogger, Chocolate Covered Katie does a great vegan black bean recipe that you can find here (although not 100% gluten free because it contains oats).
Don't be afraid to get creative and experiment with different flavors and textures. The possibilities are endless, and you might discover a new favorite variation of these gluten-free chickpea brownies!
Frequently Asked Questions About These Flourless Brownies
Honestly, no you can't! The chickpeas are well blended into the batter and do not leave a distinct flavor. They contribute to the fudgy texture and nutritional profile of the brownies without overpowering the taste.
Yes, you can cook dried chickpeas from scratch and use them in this recipe. Just make sure they are fully cooked and soft before blending them with the other ingredients.
Yes! You can use any nut butter of your choice.
Yes, you can use honey, brown rice syrup, or coconut nectar as alternatives to maple syrup or agave syrup. Keep in mind that the flavor and sweetness may vary slightly.

Gluten Free Brownies. Chickpea Brownies.

Ingredients
- 1½ cup canned chickpeas refer to blog post for bean alternatives
- ½ cup peanut butter
- ½ cup dark chocolate chips vegan
- ⅓ cup maple syrup or agave syrup
- ⅓ cup almond milk or plant milk of choice
- ¼ cup cacao powder
- 2 teaspoon vanilla extract
- 1 teaspoon baking powder
- ½ teaspoon salt I like to use pink himalayan
Instructions
- Pre heat oven to 350F or 180°
- Add all ingredients to a food processor. Blend until smooth (approx 1 minute). Stop the blender and scrape down the sides as needed.

- Line a baking tray with baking paper.
- Scoop the brownie batter from the food processor onto the lined baking tray. The batter will be quite thick. Evenly spread the batter with a spoon or spatula.

- Bake for 25 to 30 minutes.

- Transfer the brownie to a cooling rack and let it cool for 20 minutes before transferring back to the chopping board.

- Slice the brownie once cool. You can slice the brownie whilst warm / still hot but be careful as the brownie will be quite crumbly and difficult to slice without breaking.


Leave a Reply