A simple 4 ingredient coconut mochi recipe that is made in less than 10 minutes in the microwave. This is a coconut milk mochi recipe that uses real coconut milk, glutinous rice flour, monk fruit sweetener, coconut oil, and tapioca starch.

If you love making dairy free desserts with coconut milk then make sure to check out some of my other recipes such as coconut pandan ice-cream, mango sago pudding, durian sticky rice, or this 2 ingredient papaya pudding.
Why You'll Love his Recipe
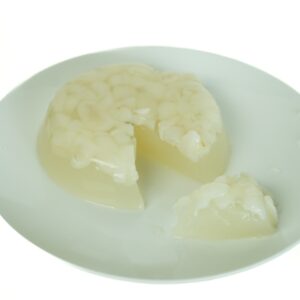
If you’ve ever craved a chewy, tropical dessert that’s not overly sweet, coconut mochi is the perfect treat. This recipe uses just four simple ingredients and is so easy to make! The delightful coconut flavor, paired with the unique chewy texture, creates a dessert that's both fun to make and eat. Best of all, you only need a few minutes and a microwave to bring it together!
Why I Consider Coconut Mochi to Be a Relatively Healthy Dessert
Coconut mochi can be a great alternative to more indulgent desserts, particularly because it uses monk fruit sweetener, a natural sugar substitute with zero calories. Additionally, coconut milk provides healthy fats that can help you feel satisfied without the need for excessive amounts of sugar or artificial ingredients. The glutinous rice flour, while starchy, is naturally gluten-free, making this a dessert option that's also accessible for those with gluten sensitivity.
Ingredients Needed for 4-Ingredient Coconut Mochi
To make mochi with coconut milk you will need the following ingredients:
- Glutinous Rice Flour: This is the backbone of the recipe, giving the mochi its signature sticky and chewy texture. Glutinous rice flour is not the same as regular rice flour, so make sure to use the correct type.
- Monk Fruit Sweetener: A natural, low-calorie sweetener, monk fruit adds sweetness without spiking your blood sugar. It’s a great alternative to sugar, especially in desserts where you don’t want an overly sweet taste. However, if you don't have monk fruit sweetener you can substitute with regular white sugar.
- Coconut Milk: Provides a rich, creamy texture and the delicious tropical flavor of coconut. Make sure it is the runny type as it will need to create a runny mixture.
- Coconut oil: coconut oil helps reduce the stickiness of the mochi whilst also keep it soft. It also adds to the coconut flavour of the mochi.
- Tapioca Starch: Used to dust the mochi and prevent sticking, tapioca starch keeps your hands and work surface from getting messy while adding a slight powdery finish to the mochi.


How to Make Coconut Mochi
Ingredients
- 1 cup glutinous rice flour
- 3 tablespoon monk fruit sweetener
- 200ml coconut milk (or runny cream)
- 1 tablespoon coconut oil (use unrefined coconut oil for a coconut flavour)
- ⅓ cup water
- ¼ cup tapioca starch (for dusting and the working bench)
Instructions
- In a bowl, mix the glutinous rice flour and monk fruit sweetener with a whisk.
- Add coconut milk and water to the dry mixture and whisk until smooth with no lumps. The batter should be slightly runny.
- Cover the bowl tightly with cling wrap and poke 15 holes in it using a toothpick. Microwave on high for 2 minutes.
- Remove and knead the mixture with a wooden spoon. Cover again with cling wrap and microwave for another 30 seconds.
- Add 1 tablespoon of coconut oil and knead again. Continue kneading until the mochi becomes smooth and stretchy. If the dough is too wet, microwave in 10-second intervals until the texture is right.
- Let the mochi cool for 10 minutes.
- Dust your working bench, hands, and mochi with tapioca starch. Knead a few times and roll the mochi into a long cylinder.
- Use a dough cutter to cut the mochi into pieces, dusting the edges with tapioca starch.
- Store in an airtight container at room temperature for 1–2 days. If refrigerated, microwave for 20 seconds to soften before eating.


Tips and Tricks for Perfecting Your Coconut Mochi
- Get the texture right: Mochi should be stretchy and smooth. If it feels too wet, microwave it in 10-second intervals until the texture becomes more pliable and less sticky.
- Knead properly: Kneading is key to achieving that perfect stretch. Whether you use a wooden spoon or your hands, make sure to knead thoroughly to get that soft, elastic texture. I like to knead the mochi whilst still in the bowl using the wooden spoon. I like to do it this way because it is really sticky! Another option is to oil your hands or use non stick food gloves to knead the mochi.
- Dust: Tapioca starch will be your best friend when handling mochi. Dust the surface, your hands, and the mochi itself to avoid it sticking to everything. But be careful to only dust once at each step. You dont want to add too much and create a hard, crumble and chalky mochi.
- Cool before cutting: Let the mochi cool for about 10 minutes before handling it, as it will be too hot and sticky to shape immediately.
Frequently Asked Questions About Coconut Mochi
Can I use regular rice flour instead of glutinous rice flour?
No, glutinous rice flour is what gives mochi its signature chewy texture. Regular rice flour won’t work in this recipe.
What’s the best way to store mochi?
Mochi is best enjoyed fresh, but it can be stored in an airtight container for up to two days. Refrigeration may harden it, but a quick microwave softens it up again. Microwave for only 20 seconds or 20 second intervals to soften.
Can I make mochi without a microwave?
Yes, you can steam the mixture instead. Just pour the mixture into a heatproof dish and steam for about 20 minutes.
I don't have tapioca starch. What can I use instead?
I prefer to use tapioca starch (also known as potato starch) but another great alternative is corn starch.
Variations
There are SO many mochi variations. I will share a few more mochi recipes soon! This is the most basic mochi recipe and is a good place to start.
Common Mistakes to Avoid When Making This Recipe
- Not kneading enough: The texture of mochi depends on thorough kneading. If you don’t knead it enough, it won’t be as stretchy and soft as it should be.
- Using too much starch: While tapioca starch is necessary to prevent sticking, too much can dry out your mochi. Use just enough to lightly dust the surface.
- Overcooking in the microwave: Mochi can become too tough if it’s microwaved for too long. Stick to the recommended times and only microwave in short intervals if necessary.
Let's Make Coconut Mochi!
Discover your new favourite mochi recipe with this 4 ingredient coconut milk mochi! If you liked this recipe, make sure to leave me a comment and review below. I love hearing from you!
For more easy and healthy recipes like this one you can follow me on YOUTUBE, INSTAGRAM, TIKTOK, and PINTEREST.

4 Ingredient Coconut Mochi
Ingredients
- 1 cup glutinous rice flour
- 3 tablespoon monk fruit sweetener refer to blog notes for alternatives
- 200 ml coconut milk
- 1 tablespoon coconut oil
- ⅓ cup water
- ¼ cup tapioca starch for dusting, refer to blog notes for alternatives
Instructions
- In a bowl, mix the glutinous rice flour and monk fruit sweetener with a whisk.
- Add coconut milk and water to the dry mixture and whisk until smooth with no lumps. The batter should be slightly runny.
- Cover the bowl tightly with cling wrap and poke 15 holes in it using a toothpick. Microwave on high for 2 minutes.
- Remove and knead the mixture with a wooden spoon. Cover again with cling wrap and microwave for another 30 seconds.
- Add 1 tablespoon of coconut oil and knead again. Continue kneading until the mochi becomes smooth and stretchy. If the dough is too wet, microwave in 10-second intervals until the texture is right.
- Let the mochi cool for 10 minutes.
- Dust your working bench, hands, and mochi with tapioca starch. Knead a few times and roll the mochi into a long cylinder.
- Use a dough cutter to cut the mochi into pieces, dusting the edges with tapioca starch.
- Store in an airtight container at room temperature for 1–2 days. If refrigerated, microwave for 20 seconds to soften before eating.


Leave a Reply